This 4k drone camera is an air-borne device (UAV). That bears a device for taking videos and uses 3840 x 2160 pixels that can shoot top quality 4K resolution video clips. The extracts from this UAV are supposed to attract cinematic students and real estate photographers. As well as documentary voyagers on generosity. Because they are specifically designed in favor of such.
Key Features of a 4k Drone Camera
The following are the essential characteristics possessed by a drone camera which can shoot 4K videos:
- Superior Video Quality: It takes videos at 4K resolution (3840 x 2160 pixels), hence providing clear images that are appropriate for high-end video production.
- Advanced Stabilization: It has structures such as gimbals and electronic image stabilization (EIS). To stabilize images that may be shaking due to turbulence in the air.
- High-Quality Sensor: Generally, it has big and high-resolution sensors like 1-inch CMOS which help increase color accuracy, image sharpness, and performance in darkness.
- Smart Flight Modes: They possess smart flight features that allow simple dynamics behind the complex. Shots like Follow Me mode, Orbit mode, Waypoints, and Return to Home.
- Extended Flight Time: They can go for long periods without their batteries dying (in most cases between 20 – 30 minutes). Leading to longer shooting sessions without disturbance.
- Obstacle Avoidance: In advanced models, obstacle detection and avoidance systems exist that help prevent collisions while flying.
- Live Streaming and FPV: They enable real-time video streaming or first-person view (FPV). Thus enabling immersive control when piloting the drone and reviewing recordings instantly.
- Adjustable Camera Angles: This allows precise control over camera angles and how it captures images including adjustable gimbals for tilting and rolling
- High-Speed Recording: It is well-suited for high frame rates (like 60fps). To create a smooth slow-motion video and make clear capturing of fast-moving pictures.
- User-Friendly Controls: Features easy-to-understand control systems and mobile applications which allow for operating, and modifying settings, as well as scheduling flights without difficulties.
Glancing at all the elements together enhances the ability to take high-quality filming from above with purposes including but not limited to movies and selling houses or even for pastime.
4K Drone Cameras That Are Popular
Some 4K drone cameras are common for their effectiveness and performance:
DJI Air 2S
- Resolution: 5.4K video (can scale down to 4K)
- Key Features: 1-inch CMOS sensor, 12 km transmission, 4-directional obstacle detection, intelligent shooting modes (FocusTrack, QuickShots)
- Why Popular: Combining portability with an image quality akin to what is perceived at professional levels and also enables specific functions during flight.
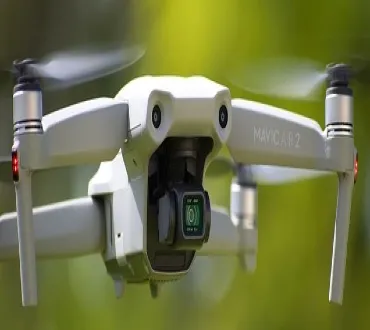
DJI Mavic Air 2
- Resolution: 4K at 60fps
- Key Features: 1/2-inch CMOS sensor, HDR video, 34 minutes of flight time, and intelligent shooting modes (FocusTrack, SmartPhoto).
- Why Popular: A great all-rounder with a long battery life and advanced features that provide excellent image quality.
Autel Robotics EVO Lite+
- Resolution: 4K HDR video at 60fps
- Key Features: 1-inch sensor, adjustable aperture capabilities; 40 mins of flight time; 6K video recording support available
- Why Popular: It provides high-quality images along with extended durations in the skies plus advanced settings for professionals behind its lens
DJI Mini 3 Pro
- Resolution: 4k @60fps
- Key Features: lightweight, tri-directional obstacle sensing capabilities over 34 minutes in air 48-megapixel photos an advanced gimbal is also part of this product.
- Why Popular: it is compact and foldable making travel easier for both professional and home user who want something powerful enough to meet their needs without taking up too much space
DJI Phantom4Pro V2.0
- Resolution: 4k@60fps
- Key features:1-inch 20mp sensor mechanical shutter flying time thirty minutes.
- What Makes It Famous: Excellent for aerial photography and videography at professional level with good obstacle avoidance capability
Autel EVO II 4K
- Resolution: 4K at 60fps (can also shoot 8K)
- Key Features: 40 minutes flight time, 4-directional obstacle avoidance system, supports 8K video recording.
- What Makes it Famous: Due to its 8k ability and dependable 4K functioning, it is a versatile pick for experts.
Applications of 4K Drone Cameras:
- Filmmaking & Videography: The 4K drones are utilized to obtain aerial scenes in films, commercials and music Videos
- Real Estate: This also provides for properties aerial footage giving potential buyers a better perspective of them.
- Surveying & Mapping: Land surveying, urban planning, and construction can all benefit from high-resolution images from drones.
- Travel & Tourism: For social media and vlogs, content creators take breathtaking landscape shots and adventure videos using drones.
- Search & Rescue: These are some of the emergencies where such drones with 4K cameras are used for search and rescue operations providing real-time high-quality visuals.
Things to keep in mind whenever handling a 4K drone camera:
- Air Traffic Rules: It is important to familiarize yourself with the laws governing it. The operation of drones within your locality including; airspace restrictions and operator’s license requirements.
- Battery Life: Use additional batteries while shooting 4K videos since they consume much more power than others so more sessions are possible before running out of energy completely.
- Storage: Highly-capacity removable memory cards with high read/write speeds must be used as 4K video takes up much storage space.
These 4K drones have revolutionized aerial cinematography by offering both professionals and hobbyists the tools they need to produce eye-catching visuals that move people deeply.
Frequently Ask Questions
Quality videos are far different when taking shots at high resolution namely3840×2160 pixels, which leads us to talk about 4k drones. Those pixels mean more details in images as well as clarity whereby they may serve professionals either in photography or video recording
Such cameras produce clear videos and images hence being very applicable for content creation at high levels, aerial cinematography, and even real estate tours plus landscape photography. Moreover, they make it possible to zoom and crop without losing quality.
Yes, if you want your 4K recorded video files which are large then you need an SD card that is fast enough typically Class 10 or UHS-I/UHS-II V30/V60 type with not less than 64 GB space.
No; some of them allow only 30fps frame rate whilst operating under their 4k option. Higher frame rates help in attaining smoother motions and slow-motion effects during postproduction stages. Therefore make sure you check what frame rates each drone allows for shooting its output at this resolution
some factors should be taken into consideration. Some of these include the length of time it can stay in the air, its ability to avoid obstacles, sensor size and stability (gimbals and so forth), transportability plus smart shooting modes among others. FPV (First Person View) feature is another essential aspect that you need to check when buying your device as well as how easy it is to control.