UI Figma in 2024

UI Figma in 2024- digitalanivipracticeb

Before we start with UI Figma, let’s understand What UI and Figma are. Then we will understand UI Figma in 2024.

What is UI?

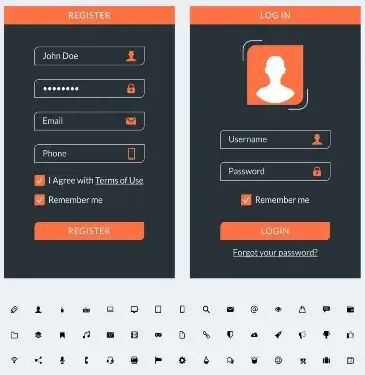
The term UI (User Interface) comprises all the visual and interactive components that a user deals with while using a digital product. Be it a website, a mobile application, or software on their PC. The essence of a UI is to create an easy-to-use yet pleasant environment that enables the user to operate the product efficiently and effortlessly.

Essential Elements of UI:

  • Visual Design: This refers to the aesthetic aspect of the interface, including but not limited to the palette, font type and size, spacing, and arrangement of components.
  • For example, a simple purist design with the elements arranged in order improves the design’s usability.
Interactive Elements:
  • These include the various components of the interface the user operates like buttons, clickables, forms navigation menus, and sliders.
  • For instance a ‘Submit’ button out of the Form field, or a searching space in which a user interacts by entering the desired query.
Icons and Symbols:
  • These small images denote an action, object, or idea. These are particularly helpful in making the users aware of the actions that they can perform.
  • For instance, a search embedded in a magnifying glass image or a settings icon in a gear image.
Typography:
  • These are text presentations within the user interface that call for appropriate font size selections, font style, and arrangement of text.
  • For instance, titles can be in bold font, while the rest of the body will only use regular font to ensure hierarchy.
Layout:
  • The positioning of the UI controls on the screens such that the ordering and arrangement of the information presented is logical and easy to understand. And also facilitates the smooth navigation of the users across the interface.
  • For instance, using a grid layout to make sure all the elements are in rows and columns makes it easy to manage

What is Figma?

Figma is a favored design platform among UI/UX designers. It is accessed online to carry out tasks such as user interface design, prototype design, and development of design systems. The tool facilitates team working in real time between members of the design team. Therefore it is appropriate for any product to be digital eg websites, mobile applications… etc. Here is how Figma performs the function of UI designing.

Main advantages of Figma for UI:
Real-time Interaction:
  • Since Figma allows team members to take part in the same design at the same time, it is perfect for team design. All changes are visible at the same time so there is no need for redundancy in changes done to different file copies.
2D Drawing/ Vector-Based Design:
  • Figma is a vector design software other than raster which implies all the designs prepared are in a vector form and can be scaled to any size without any pixelation.
  • This is very important in the case of making UIs that are responsive to different screen sizes.
Design Systems And Components:
  • Figma has provisions for making distinct elements, for example, buttons, icons, or input fields, which can be used in several places in a project and can be easily redeployed whenever needed.
  • This prevents errors in design and eases the complexity of design especially when one is designing a rich interactive interface.
Transitional Animation/ Prototyping:
  • You can connect the user interface screens to make interactive prototypes within Figma. This is how designers can create user flows and clickable prototypes for testing before development.
Handoff to Developers:
  • Figma makes the process of hand-off to the developers easier since the developers are given everything. They are required to affect the design including the appropriate sizes, colors, and even the CSS codes of the designs.
Design across various Devices/ Responsive Design:
  • Figma encourages designers to constrain and set rules for auto-layouts which allows for the creation of responsive designs.
  • This means your design will adapt to different sizes of screens i.e. mobile screen, tablet and desktop.
Destinations/ Plugins:
  • Figma has many plugins that increase its capabilities. Including accessibility tools, animation, and productivity enhancers to streamline the processes involved in UI Figma in 2024.

Benefits of Using UI Figma in 2024:

  • Universal Application: Figma is web-based so it can be accessed on any type of operating system (Windows OS, Mac OS, and even Linux) with internet connectivity only.
  • Management of Project Versions: Any design within Figma is saved whereby it is possible to know what changes were made when and also go back to earlier versions if need be.
  • Element Library Sharing: Design libraries can be created within a team of designers and made accessible to all the members of the team. To eliminate inconsistency of UI elements across design work in different projects and teams.
  • Simplicity: Figma has a simple interface that a beginner can adapt to very easily thus enabling a new user to learn designing UIs in a short period.

Few Examples of using UI Figma in 2024:

  • Creating the user interfaces of websites, smartphone applications, or software applications.
  • Making high-fidelity designs to show how users are going to interact with it.
  • Creating a design hierarchy to ensure all products portray the same identity.
  • Working with other creative designers, developers, and other stakeholders concurrently.

Figma is now a must-have tool for UI designers. Due to its robust features, ease of working together, and versatility when designing on different screens.

Frequently Ask Questions

What do you mean by Figma?

Figma is a modern design tool primarily focused on UI/UX designs. It is a cloud-based application with the necessary capabilities for design, prototyping, and real-time collaboration. This makes it suitable for developing layouts for websites, mobile apps, or any form of digital media

Is Figma paid or free?

Figma has a free plan which comprises of simple features generally acceptable by an individual or a small team. On the contrary, there are more expansive paid options available, including those designed for group work, high-level screen transitions, and management of a design system

Can I invite others to work on my design in Figma?

Of course. Another thing Figma is famous for is that you can work on the design even at the same time with other team members and leave comments for each other to view, hence perfect for group work designs

How do I prototype in Figma?

To create a prototype in Figma, there are interactive connections that join frames (also known as artboards). You simply pick an object (a button, for example) and with the help of the prototype tab, reach out to the appropriate frame with a line. You can then define how and when the link will be activated, for instance, by assigning when the user clicks.

What are Figma components?

Figma components are design elements that can be created once and reused all over the project. If you change one component, every single place the component exists within your design will change, making it easy and quick to have a consistent design.

Camera Angles In Photography

YouTube Script Writing (2025) , digitalaivipracticeb

As we know images play an important role in blogs. Images are captivating which makes the readers engaging and appealing. Audiovisual content encourages sharing on social media which in turn increases the traffic to the blog and its pages. Pictures are used in a way that expresses feelings or ideas and goes beyond the written work. In this blog, we will talk about Camera Angles in Photography

So 1st we will understand :

What are Camera Angles In Photography?

Furthermore, it can be stated that Angles are different relative positions of the camera when photographing.

Camera angle options determine how a particular subject will be interpreted by the audience and which particular feelings and emotions will be conveyed. In other words, camera angles can influence the feeling, narrative, and overall arrangement of an image.

Some of the basic camera angles include
  • Eye level which is neutral and natural.
  • High angles are where the subject looks smaller or weak.
  • Low angles are where the subject looks bigger or more dominant than the viewer.
  • bird-eye views are where an overhead shot is taken, and
  • Dutch angles are tilted angles used to create a feeling of tension in the image.
  • The angle influences not only the impact of the image but also the story within the image.

The Importance of the Camera Angles in Photography

  • Point of View and Emotion: Various angles evoke different emotions. For example, a camera positioned below the subject will make that subject look greater and highly dominating however if the camera was fixed high over the subject, the subject may look timid.
  • Telling a Story: Camera angles are also important in narration. A Dutch angle may speak of an emergent situation, however, an eye-level angle shot will tend to bring understanding and normalcy.
  • Emphasis and Direction: Angles tend to direct the viewer’s attention towards certain parts of the frame. This can be illustrated by the fact that if a subject is captured from below, its gravity-defying features shall be highlighted whereas a wide shot seeks to place the subject in the context of the environment.
  • Space and Volume: The use of different angles in capturing images can also create a visual illusion making a flat picture look like it has some volume. This can also be to make things more interesting and appealing.
  • Form: The angle of an image changes many compositional aspects including the rule of thirds and leading lines as well as harmony. This gives some opportunities to work with symmetry and imbalance.
  • Framing: The angle works out the position of the subject in his or her surroundings. An establishment shot portrays the surrounding landscape but on the contrary, a close-up shot focuses on the face or external attributes.
  • Particularity: Novelty angles suited for certain occasions add to the photographer’s stylistic creation. A portfolio may also exhibit prospect or rear views that internal angles are normally the same.

Strategically control the angles of the camera to tell a story and convey an artistic idea.

Camera Angles in Photography
  • Eye Level Angle: The Encyclopedia-titled Camera is mounted at the eye level of the subject. Thus, offering a very natural, unexaggerated perspective. It is also the most so used angle in photography of simple natural photos.
  • High Angle: A high angle is when the camera is pointed downwards at the subject. Because of this angle, the subject seems to be dwarfed weakened, or even vulnerable.
  • Low Angle: The camera is fixed below the subject, with the lens trained upwards. It tends to give an imposing or dominant look to the subject.
  • Bird’s Eye View Angle: The camera in this case is held above the subject. This is known as an overview shot. This angle is different from others as it does not protrude the subject giving the subject an impression of being flat or far.
  • Worm’s-eye View Angle: This is although a very low angle, a dramatic point of view near the ground directed towards the viewer’s subject which exaggerates captures of the subject to use.
  • Dutch Angle (Tilted): The angle is shot depicting uneasiness or that something is amiss. The camera is tilted to an angle and focused on an object.
  • The Shoulder Angle: Over-the-shoulder angles place the camera behind someone’s shoulder and illustrate the setting or the view the person is gazing at. This is most often seen in stories and conversational scenes.
  • Canted Angle: In-camera usage, where the image is not straight and level, instead has been slanted at an angle or has been tilted on the left or right planes. It often creates a great distortion and dramatic movement effect.

Every angle adds an emotion or a viewpoint to the picture, thus altering the way the spectator views the object in question.

Frequently Ask Questions

What is meant by camera angles in photography?

Camera angles indicate the angle from which the photo is taken and how the subject matter is represented.

What makes camera angles so essential?

Camera angles help set the right mood, highlight certain aspects of the image, and develop a storyline within the photograph.

What are some of the camera angles that are predominantly used in photography?

Some of the angle variations are eye level, high angle, low angle, bird’s eye view, and worm’s eye view.

What is the influence of high angle on the subject?

High-angle shots tend to diminish the size of the subject making it seem weaker and creating vulnerability

What should be the camera angle for a portrait shoot?

In posture portraits focal plane is usually horizontally aligned to eye level. This is ‘natural’ looking and offers a balanced view.

Iconography Design

Iconography Design, digitalanivipracticeb

The digital interface’s creation and utilization of icons are embodied in the design of iconography. They are small symbolic graphics that help simplify communication. Provide direction for users, and enhance navigation. Thereby improving overall user experience. Well-designed icons are intuitive and also enhance clarity and usability in any digital product.

Fundamental Guidelines for Iconography Styling:

  • Simplicity: Icons ought to communicate their meaning quickly and straight away. Avoid adding too many details or unnecessary things into them that would make the icon complicated.
  • Consistency: Icons must follow a certain style across the entire interface. This includes keeping a similar shape, size, thickness of lines, colors, and visual weight to maintain balance.
  • Clarity: The main goal of icons is to communicate ideas in an easy-to-understand manner. Therefore opt for these designs which are known across the globe and leave no room for uncertainty.
  • Scalability: Icons should be built with scalability in mind so that they can effectively serve both small-scale and large-scale images without losing clarity or details.
  • Context Relevance: The symbols should be in line with the work they are meant to convey. For instance, a trash can pictogram should mean “remove,” whereas a speculum is often interpreted as “inquire.”
The following are different kinds of icons:
  • Functional icons: These are specific tasks represented by icons like “save” and “edit” for example.
  • Navigation icons: These help users navigate various aspects of the interface and include a button labeled “home” or an arrow pointing back.
  • Status Icons: Some symbols show whether something is in good condition or not such as a circular indicator with dots inside it that turns on while files are still uploading before turning off once all files have uploaded successfully.
  • Object-based Icon: Representations include such things as documents, folders, and images.
  • Social Icons: Representative Social Media Platforms include chat, Facebook, and Twitter amongst others.
Illustrative practices of making icons
  • Employ Familiar Metaphors: Use popular symbols that guarantee immediate recognition, such as a shopping cart for “add to cart” or an envelope for “email”.
  • Look this way and you will see it offered in your local store by companies providing texting services at relatively higher rates. Some people opt for mobile applications while others prefer websites, which are also accessible via smartphones or tablets. You can get their services from any point around the world. Since they have made sure that their platforms are compatible with almost all devices including iPhones, Androids, and BlackBerries.
  • Adopt the right coloration schemes: Maintain harmony with product design in terms of colors. And use different colors to depict conditions (e.g., red used in errors, green used in success).
  • Good practices will ensure your symbols convey meaning from the start and meet their expected purpose.

Despite being consistent in terms of referring to images, the words iconography and icon design are different in meaning

Iconography:
  • Definition: Iconography is concerned with the symbolic significance and employment of icons in a given context, system, or culture. It deals with the global study and interpretation of images as signs of history. When they transmit certain meanings or ideas. Iconography includes all about ways we use and comprehend them visually.
  • Focus: Iconography discusses the significance of symbols and their meanings conceptually or culturally. This includes how they convey messages, symbolize activities, and are interpreted by people. It focuses more on the functions of such elements within some system (for example, in an interface, a holy book, or artistic studies).
  • Example: For instance, within a digital interface across various applications. Iconography looks at how the ‘heart’ symbol is recognized as signifying either a “like” or “favorite” action.
Icon Design:
  • Definition: Icon design is the art of designing individual icons. It is a combination of artistic and technical abilities necessary for making visual symbols that are simple, functional, and beautiful. The focus of icon design is to define the icon’s visual appearance, style, and usability.
  • Focus: Icon design is concerned with one thing – creating and visually designing icons. This involves deciding on their shape, line weight, color, size, and consistency so that they may be clear and functional within different contexts.
  • Example: One aspect of icon design would be the creation of the ‘heart’ icon which has clean lines, suitable scaling, and follows the app’s design system.
Basic Differences:
  • Scope: Icon design is particularly centered on the development and design of icons. Iconography is a wider subject matter encompassing meanings as well as their interpretations.
  • Focus: An understanding of symbols portrays the purpose they serve alongside. How they are perceived. Iconographers create such symbols in a manner that is not only visually appealing but also adheres to some defined stylistic order.

To sum it up:

Iconography focuses on the cultural as well as contextual meaning. The icon design is about the process used to create them.

User experiences can be greatly improved through iconography. Design that follows the principles and best practices of generating implicit visual signals for ease of navigation and use.

Frequently Ask Questions

What is the purpose of using symbols in design?

Iconography design is the process of using icons to create and communicate meanings, actions, or objects. In digital interfaces or products. It emphasizes developing simple, customizable, and constant-looking pictorial representations that will facilitate easier user interaction

Why is iconography important in UI/UX design?

Cognitive understanding of what an interface entails is primarily based on its design elements such as colors, and shapes including their sizes. Therefore, for this reason, it can be said that icons play significant functions within a UI/UX context. Well-thought-out symbols alleviate mental stress; they improve usability while enhancing that all-important emotional connection between users and systems They also represent complex concepts through concise visualizations

What Makes an Effective Icon?

An effective icon should be:
Simple: Easily understandable at a glance. Recognizable: Universally familiar or intuitive. Consistent: In line with the overall design language and style of the product. Scalable: Clear and functional at both small and large sizes. Relevant: Appropriately represents the action or object it is associated with.

What is the Difference between Iconography and Icons?

While icons are symbols used within that system, iconography refers to the broader system or collection of icons used to convey visual meaning in a specific context (e.g., an app’s navigation system). Iconography also deals with the interpretation and meaning of the icons, while icons are the tangible visual elements themselves

What are some of the strategies for ensuring consistency in designing icons?

To maintain uniformity in iconography design:
Keep all icons within one inclusive theme (for example, an even stroke width, color uniformity, and similar shapes).
Apply a scaled-up grid system to all designs.
Stick to metaphors and visual indicators that help users identify particular items.
Make all icons possess nearly equal sight mass and equilibrium hence creating equilibrium on the interface.

10 Different Types of Microphones

10 Different Types of Microphones, digitalanivipracticeb

10 Different Types of Microphones. There are various categories of microphones, each with its distinct way of capturing sounds that suit particular types of sound sources, such as instruments or vocal qualities. Some microphones may reject noise very well and have high directionality thus making them suitable for live performances while others are more effective at recording nuanced sound details which are ideal in a studio recording environment.

Microphones of various kinds exist, each with its use cases in audio recording and production. Below are the core categories:

What is Microphones

The electronic gizmo which transforms acoustic information into an electric signal is called a microphone. The microphone operates by picking up the sound waves (the air’s ripple pattern) and changing them into amperometric signals that could be amplified, recorded, or repaid because they are used variously such as in music recording or television production, and are often heard in telephones as a result of popularizing this communication medium.

How Microphones Function:
  • The sound waves reach the diaphragm of the microphone (a delicate, malleable membrane).
  • This causes it to vibrate in resonance with them.
  • By the type of microphone used, these vibrations will then be transformed into an electric signal.

Types of Microphones

1. Dynamic microphones.
  • Operating principle – It is characterized by a diaphragm attached to wire coils that move within magnetic field generating an electric signal.
  • Live performances, and loud sound sources (e.g., drums and guitar amplifiers).
  • Ideal for – live shows, sound recording of humans’ voice or musical instruments as well as broadcasting. Long-lasting, good at ignoring background noise, inexpensive.
  • Examples: Shure SM58, Sennheiser MD421.
2. Condenser Microphones
  • Operating principle -Thin diaphragm closely positioned to a backplate requiring phantom power.
  • Ideal for – studio recordings, vocals and acoustic instruments.
  • Examples Audio-Technica AT2020 and Neumann U87 are examples of these kinds of microphones.
3. Ribbon Microphones
  • Operating principle – Use thin metallic ribbons suspended between magnets producing electrical signals.
  • Advantages: Warm, natural sound; smooth and lifelike high-frequency response.
  • Ideal for producing vintage sounds, recording vocals, and guitar amplifiers.
  • Examples: Royer R-121, AEA R84
4. Lavalier Microphones
  • Operating principle – Small clip-on devices using either dynamic or condenser technology.
  • Ideal for carrying out interviews, television broadcasting, making presentations and theatrical performances.
  • Small size; it doesn’t need hands hence makes it ideal for capturing speech.
  • Examples would be Sennheiser ME 2 and Rode Lavalier.
5. Shotgun Microphones
  • Operating principle – very directional mic having narrow pick-up pattern (cardioid or supercardioid).
  • Ideal for Film production, TV programming, and field recording among others.
  • Extremely focused on capturing external sound emanating from afar such as the voice of an actor in a movie.
  • Some examples include Sennheiser MKH 416, Rode NTG4+.
6. USB Microphones
  • How it Works: They are either condenser or dynamic microphones with built-in analog-to-digital converters that connect directly to computers via USB cables
  • Best For: Podcasting, streaming, home recording.
  • Some examples include Blue Yeti and Audio-Technica AT2020USB+
7. Boundary Microphones (PZM)
  • How it Works: To obtain an even distribution of sound in a room, these microphones should be positioned close to reflective surfaces.
  • Best For: Conference rooms, theater, ambient sound recording.
  • Examples: Shure MX391, Crown PZM-30D.
8. Wireless Microphones
  • How it Works: It consists of a dynamic or condenser microphone connected with the transmitter which sends audio wirelessly to receiver.
  • Best For: Live events, presentations, and performances where mobility is required.
  • Examples: Shure BLX288, Sennheiser EW 100 G4
9. Contact Microphones
  • How it Works: Picks up vibrations directly from solid surfaces rather than through the air.
  • Best For: Acoustic instruments like violins, guitars, or percussive instruments.
  • Examples: K&K Sound Pure Mini, Schertler Basik.
10. Parabolic Microphones
  • How it Works: Uses a parabolic reflector to collect and focus sound on microphone.
  • Best For: Sports broadcasting, nature recording and long distance sound pickup.
  • Examples: Telinga PRO-X, Klover Mik 26.

Each microphone type is tailored for its own purpose and has distinct features, whether they are live performances, studio recordings, film production or dedicated instrument. So the “best” microphone is determined by the specific application.

Frequently Ask Questations

What are the primary classifications of microphones?

Microphones differentiate in terms of type: Dynamic, Condenser, Ribbon, Lavalier and Shotgun. Every type serves a unique demand either for recording or performing live on stage.


What is the purpose of Dynamic Microphone?

Dynamic microphones have been tested against live show performances as well as with high intensity sounds such as from guitar amplifiers or drums where they have emerged tops owing to their strong nature that can take in any amount without breaking down


What is the comparison between condenser and dynamic microphones?

Condenser microphones tend to be more sensitive thereby providing better sound quality which makes them ideal for studio recording purposes. On the other hand, dynamic models destroy all background noise leaving clear vocals making it appropriate for use during stage performances.


Which type of microphone is appropriate in video production?

Amongst others shotgun microphones dominate this area due to their capability of shooting straight ahead only picking sound from one direction ignoring everything else around them.

17 UI Design Elements

17 UI Design Elements, digitalanivipracticeb

17 UI Design Elements. UI design components are what form user interfaces. They aid users in communicating with a digital product. Thus generating an appealing and practical experience at the same time. The fundamental UI design elements are listed below:

1. Buttons

  • Function: Allow users to execute certain tasks (like submit, save, or cancel).
  • Varieties: Primary, secondary, ghost buttons.
  • Recommended Practices: Buttons must have clear titles, visible and well-matched colors as well as sizes
2. Icons
  • Function: A depiction that embodies usability by making actions or categories easily identifiable.
  • Classification: Navigation icons (home, search), action icons (edit, delete), status icons (loading, error).
  • Best Practices: Simple symbols understandable everywhere in the world and if necessary accompanied by textual labels.
3. Text Fields
  • Function: For entering texts in forms such as login screens or search engines.
  • Types include: Single-line (name/email) and multi-line (comments/feedback).
  • Best Practices: Label texts clearly; use helpful placeholder information within them. Provide clear validation/error messages ensuring errors are easy to spot.
4. Navigation
  • The purpose of navigation is to help users find their way around an interface.
  • The types include navigation bars, side menus, breadcrumb trails, and tab bars.
  • Intuitive navigation sitewide across devices should be achieved since they need consistency.
5. Sliders
  • Help users to change a value or to select from a range of options (like volume control, and price filters).
  • Horizontal or vertical sliders are common.
  • Labels on sliders need to be clear and also have start and end values as well as visual feedback for changes.
6. Forms
  • Purpose: To request input from users.
  • Elements: Text fields, drop-down list; checkboxes, radio buttons.
  • Best Practices: Forms should be easy to read, organized so that they contain clear information, and give feedback in real-time (for example, validation errors).
7. Cards
  • Purpose: To enable users to consume related content quickly into one block by grouping it.
  • Use Cases: Product listings, blog posts, and social media feeds.
  • Best Practices: Cards must have a hierarchy where images are placed together with titles and action buttons.
8. Modals (Popups)
  • Purpose: Display more information or request an action without leaving the current page.
  • Types include dialog boxes (confirmation alerts) and forms.
  • Best practices categorize models as straightforward, easily closable, and non-disruptive to user experience.
9. Dropdown Menus
  • Purpose: To provide users with a variety of choices.
  • Types: Standard dropdowns; multi-selection dropdowns.
  • Best Practices: Keep options easy to scan, and ensure that the dropdown is usable across all devices.
10. Progress Bars
  • Purpose: To show users how far along in a process they are- loading or unloading, for example, or step-wise tasks.
  • Types include linear or circular progress indicators.
  • Best Practices: Use clear and exact progress indicators to give feedback and shape user expectations.
11. Notifications & Warnings
  • Purpose: Give instant replies or notifications to the end user (Examples: messages indicating successful actions and warning messages indicating errors made or updates).
  • Types: Toast notifications, banners, modal alerts.
  • Best Practices: Clarity is key, therefore notifications should be brief and to the point without being loud. It is important to note that this is not a definitive list, since there other aspects of creating a beautiful and usable interface.
12. Tabs
  • Purpose: Allow users to change different views or sections within the same context.
  • Best Practices: Tabbed elements must be clearly labeled as well as visually distinctive.
13. Accordions
  • The objective is to show or hide the additional content in collapsible sections.
  • Frequently asked questions (FAQs) and expandable lists are examples of web pages with this feature.
  • It is essential for an accordion header to be labeled so that anyone can know what they are opening or closing as well as visual indicators like arrows to tell when content has been opened or closed.
14. Toolbars
  • The purpose is to contain related commands, tools, or actions regarding specific functions (for instance, text formatting in a word processor).
  • Keep it simple and only include majorly used options for efficiency.
15. Breadcrumbs
  • The purpose of breadcrumbs is to assist users in knowing where they are in the interface and return to previous sections.
  • For example, there are websites with deep hierarchies of pages and e-commerce platforms for this use case.
  • Therefore, visible and clickable breadcrumbs indicating a clear path should be ensured.
16. Pagination
  • Splitting content into multiple pages allows users to jump from one place to another between these pages alone.
  • This can apply to blog posts, product lists as well as large data sets.
  • Therefore, make sure pagination controls are accessible enough while at the same time showing the current page clearly.
17. Toggle Switches
  • These switches enable users to alternate between two states such as turning on and off or enabling and disabling.
  • Use cases include settings toggles such as dark mode and notifications among others here too.
  • A label that is easy to understand must be used while making sure that the default option is easily identifiable.

These elements are the most important part of designing user-friendly and attractive interfaces. The perfect UI design integrates these components seamlessly producing an interactive product whose use by its audience is both easy and automatic at the same time

Frequently Ask Questions

What are the UI design elements?

Components that constitute the visual interface of a digital product are known as UI design elements. Items such as buttons, text fields, icons, sliders, and navigation bars are included in this category in addition to other items that users interact with while completing tasks. This is aimed at making it more interesting to users while still being functional

What are the functions of UI design elements?

UI design elements are primarily intended to improve user interaction with a specific product or service. They guide users through tasks, improve interface usability at large, and give feedback during interaction sessions. Moreover, they play a critical role in establishing a product’s visual appeal and brand identity.

 How do UI design elements differ from UX design elements?

UI design elements refer to all visual aspects of an interface as well as interactive ones such as buttons, icons, and forms among others while UX on the other hand focuses mainly on the user experience which entails flow, functionality, and usability of a product at large. Data collection considerations therefore take different perspectives depending on whether one is looking at UI or UX.UI is more preoccupied with looks/governance whereas UX looks into feelings during the usage of any item

Which are the main elements of UI design?

The following are some of the most significant aspects of UI design:

Buttons: They enable users to carry out tasks.
Navigation Menus: They facilitate user movement through various parts of the interface.
Text Fields: These allow users to enter data or information.
Icons: These provide visual indications for different actions or categories.
Forms: They collect user data for activities such as signing up or checking out.

What can I do to make UI design elements more accessible to everyone?

To make user interface components accessible:

Make sure there is a significant contrast between text and background for it to be legible.
Make certain that there are clear labels on buttons, forms, and icons.
Use larger components that are more easily clickable.
Make use of alternative texts for icons and images as a support for screen readers.
The users who experience disabilities should have a way of moving around with a keyboard.

Drone Camera 4k

Mini Drone Camera 2024 , digitalanivipracticeb

This 4k drone camera is an air-borne device (UAV). That bears a device for taking videos and uses 3840 x 2160 pixels that can shoot top quality 4K resolution video clips. The extracts from this UAV are supposed to attract cinematic students and real estate photographers. As well as documentary voyagers on generosity. Because they are specifically designed in favor of such.

Key Features of a 4k Drone Camera

The following are the essential characteristics possessed by a drone camera which can shoot 4K videos:

  • Superior Video Quality: It takes videos at 4K resolution (3840 x 2160 pixels), hence providing clear images that are appropriate for high-end video production.
  • Advanced Stabilization: It has structures such as gimbals and electronic image stabilization (EIS). To stabilize images that may be shaking due to turbulence in the air.
  • High-Quality Sensor: Generally, it has big and high-resolution sensors like 1-inch CMOS which help increase color accuracy, image sharpness, and performance in darkness.
  • Smart Flight Modes: They possess smart flight features that allow simple dynamics behind the complex. Shots like Follow Me mode, Orbit mode, Waypoints, and Return to Home.
  • Extended Flight Time: They can go for long periods without their batteries dying (in most cases between 20 – 30 minutes). Leading to longer shooting sessions without disturbance.
  • Obstacle Avoidance: In advanced models, obstacle detection and avoidance systems exist that help prevent collisions while flying.
  • Live Streaming and FPV: They enable real-time video streaming or first-person view (FPV). Thus enabling immersive control when piloting the drone and reviewing recordings instantly.
  • Adjustable Camera Angles: This allows precise control over camera angles and how it captures images including adjustable gimbals for tilting and rolling
  • High-Speed Recording: It is well-suited for high frame rates (like 60fps). To create a smooth slow-motion video and make clear capturing of fast-moving pictures.
  • User-Friendly Controls: Features easy-to-understand control systems and mobile applications which allow for operating, and modifying settings, as well as scheduling flights without difficulties.

Glancing at all the elements together enhances the ability to take high-quality filming from above with purposes including but not limited to movies and selling houses or even for pastime.

4K Drone Cameras That Are Popular

Some 4K drone cameras are common for their effectiveness and performance:

DJI Air 2S
DJI Air 2S
  • Resolution: 5.4K video (can scale down to 4K)
  • Key Features: 1-inch CMOS sensor, 12 km transmission, 4-directional obstacle detection, intelligent shooting modes (FocusTrack, QuickShots)
  • Why Popular: Combining portability with an image quality akin to what is perceived at professional levels and also enables specific functions during flight.
DJI Mavic Air 2
  • Resolution: 4K at 60fps
  • Key Features: 1/2-inch CMOS sensor, HDR video, 34 minutes of flight time, and intelligent shooting modes (FocusTrack, SmartPhoto).
  • Why Popular: A great all-rounder with a long battery life and advanced features that provide excellent image quality.
Autel Robotics EVO Lite+
  • Resolution: 4K HDR video at 60fps
  • Key Features: 1-inch sensor, adjustable aperture capabilities; 40 mins of flight time; 6K video recording support available
  • Why Popular: It provides high-quality images along with extended durations in the skies plus advanced settings for professionals behind its lens
DJI Mini 3 Pro
  • Resolution: 4k @60fps
  • Key Features: lightweight, tri-directional obstacle sensing capabilities over 34 minutes in air 48-megapixel photos an advanced gimbal is also part of this product.
  • Why Popular: it is compact and foldable making travel easier for both professional and home user who want something powerful enough to meet their needs without taking up too much space
DJI Phantom4Pro V2.0
  • Resolution: 4k@60fps
  • Key features:1-inch 20mp sensor mechanical shutter flying time thirty minutes.
  • What Makes It Famous: Excellent for aerial photography and videography at professional level with good obstacle avoidance capability
Autel EVO II 4K
  • Resolution: 4K at 60fps (can also shoot 8K)
  • Key Features: 40 minutes flight time, 4-directional obstacle avoidance system, supports 8K video recording.
  • What Makes it Famous: Due to its 8k ability and dependable 4K functioning, it is a versatile pick for experts.

Applications of 4K Drone Cameras:

  • Filmmaking & Videography: The 4K drones are utilized to obtain aerial scenes in films, commercials and music Videos
  • Real Estate: This also provides for properties aerial footage giving potential buyers a better perspective of them.
  • Surveying & Mapping: Land surveying, urban planning, and construction can all benefit from high-resolution images from drones.
  • Travel & Tourism: For social media and vlogs, content creators take breathtaking landscape shots and adventure videos using drones.
  • Search & Rescue: These are some of the emergencies where such drones with 4K cameras are used for search and rescue operations providing real-time high-quality visuals.

Things to keep in mind whenever handling a 4K drone camera:

  • Air Traffic Rules: It is important to familiarize yourself with the laws governing it. The operation of drones within your locality including; airspace restrictions and operator’s license requirements.
  • Battery Life: Use additional batteries while shooting 4K videos since they consume much more power than others so more sessions are possible before running out of energy completely.
  • Storage: Highly-capacity removable memory cards with high read/write speeds must be used as 4K video takes up much storage space.

These 4K drones have revolutionized aerial cinematography by offering both professionals and hobbyists the tools they need to produce eye-catching visuals that move people deeply.

Frequently Ask Questions

4K Drone Camera: What is it?


Quality videos are far different when taking shots at high resolution namely3840×2160 pixels, which leads us to talk about 4k drones. Those pixels mean more details in images as well as clarity whereby they may serve professionals either in photography or video recording

Why use a drone with a 4k camera?

Such cameras produce clear videos and images hence being very applicable for content creation at high levels, aerial cinematography, and even real estate tours plus landscape photography. Moreover, they make it possible to zoom and crop without losing quality.

Do all 4K drones need special memory cards?

Yes, if you want your 4K recorded video files which are large then you need an SD card that is fast enough typically Class 10 or UHS-I/UHS-II V30/V60 type with not less than 64 GB space.

Is it possible for all 4K drones to shoot 60fps footage in 4K?

No; some of them allow only 30fps frame rate whilst operating under their 4k option. Higher frame rates help in attaining smoother motions and slow-motion effects during postproduction stages. Therefore make sure you check what frame rates each drone allows for shooting its output at this resolution

When you are purchasing a 4K drone camera

some factors should be taken into consideration. Some of these include the length of time it can stay in the air, its ability to avoid obstacles, sensor size and stability (gimbals and so forth), transportability plus smart shooting modes among others. FPV (First Person View) feature is another essential aspect that you need to check when buying your device as well as how easy it is to control.

How To Learn UI Design?

How To Learn UI Design? digitalpracticeb

Mastering UI design involves grasping design principles, and tools and attaining hands-on experience. Here is a stepwise guide for you to get started. How To Learn UI Design?

Grasp Basic Design Principles:

  • Typography: Be able to apply fonts in UI design efficiently.
  • Color Theory: Find out how to develop color schemes, use contrast, and know color psychology.
  • Visual Hierarchy: Learn how to arrange the webpage’s elements to make it easy for the users to navigate.
  • Spacing and Layout: Master grid systems and spacing for clean and organized designs.
Resources:
  • “The Design of Everyday Things” via way of means of Don Norman
  • “Don’t Make Me Think” by Steve Krug

Understand UI/UX Principles

  • Usability: Find out how to create interfaces that are user-friendly and easy to navigate.
  • Accessibility: Learn how you can make your designs inclusive for people with disabilities (e.g., proper use of colors, readable fonts, alt text).
  • Consistency: Use similar patterns throughout your design.
  • User-Centered Design: Concentrate on the needs of users, their behavior patterns as well as goals during designing any product.
Resources:
  • Nielsen Norman Group (NNG) articles and videos on UI/UX design
  • “Universal Principles of Design” by William Lidwell

Learn UI Designing Instruments

  • Figma: This is a web-based interface designing tool, prototyping, and collaboration.
  • Adobe XD: Like Figma, it provides powerful features for UI/UX design and prototyping.
  • Sketch: It’s widely used by macOS users focusing mainly on UI and icon development.
  • InVision: it’s a prototyping tool that works well with other design software.
Resources:
  • Figma official tutorials, Sketch tutorials, Adobe XD tutorials
  • YouTube channels such as DesignCourse and Flux Academy.

 Follow Design Trends

  • Stay informed about current design trends in this field. Innovating UI designs are available on websites.
  • Like Dribbble, Behance, or Awwwards which can serve your creative purpose
Resources:
  • Dribbble (for design inspiration)
  • Behance (for creative portfolios)
  • Awwwards (for web design examples)

Platforms

  • Coursera: UI/UX Design Specialization (by Google or California Institute of the Arts)
  • Udemy: UI Design Bootcamps
  • (IDF): A company that offers courses specifically on UI design and usability.
  • Treehouse: UI/UX tracks for starting point.

Practice, Practice, Practice

  • Recreate the existing interfaces: choose any app or website which are appealing to you and redesign it. Concentrate on usability improvement or aesthetics enhancement.
  • Work on personal projects: develop your portfolio by designing websites, mobile applications, or other interfaces.
  • Collaborate: join design communities to get feedback, collaborate on projects, and learn from others.

Get Feedback and Iterate

  • Share your designs with anyone in the design community or platforms that use social media like LinkedIn or Dribbble.
  • Accept critiques freely hence advancing the quality of your work consistently.
Resources:
  • Join design communities like UX Design on Reddit, Designer Hangout on Slack, and Dribbble.

Build a Portfolio

  • Find a place to put together a professional portfolio containing some best UI designs that you have done. Concentrate on practical applications used in these projects while elaborating on how they were designed for each single task done.

Learn How to Code (Optional)

  • Although coding isn’t a requirement, if you comprehend fundamental front-end technologies like HTML, CSS, and JavaScript you will have an improved dialogue with developers and you can also understand design limitations.

Resources:

  • FreeCodeCamp
  • Codecademy’s Front-End Developer track.

The gradual enhancement of your skills in UI design can be achieved through an amalgamation of the theory, practice, and comments on it.

Free Resources

  • YouTube Tutorials: These are free high-quality resources concerning UI design.
  • Example: DesignCourse or Flux Academy (YouTube channels)
  • Blogs & Articles: Websites like Nielsen Norman Group and Smashing Magazine provide free articles on UI/UX design principles.
  • Design Communities: Platforms such as Reddit (e.g., r/UI_Design, r/UserExperience) include discussions, feedback, and advice at no charge.
  • Free Courses:
  • Coursera (Audit Mode): It gives students access to course materials at no cost (though without certification) on subjects like Google UX Design.
  • Interaction Design Foundation (IDF): Some contents are available for free, but complete access requires payment
  • Free Tools: Figma, Sketch (trial), and InVision provide free versions to use in practice UI designs
  • Cost: $0

Paid Online Courses

  • Coursera: UI/UX Specializations (offered by Google, CalArts, etc.). They can be audited without a fee; however, certificates have an associated fee
  • Price: $39–$79 per month (subscription-based)
  • Udemy: Offers UI/UX courses with eternal access.
  • Price: ten bucks up to two hundred dollars per course depending on the promotion
  • LinkedIn Learning: Provides UI/UX design courses certified as well.
  • Price: $29.99 each month or $19.99 every year
  • Skillshare: This offers several choices to choose from concerning UI design.
  • Price- $19 per month or if you decide year you pay only $99 per year
  • Interaction Design Foundation (IDF): There are targeted UI and UX programs here.
  • Price: $16–$19 per month (billed annually)

Boot camps

Boot camps offer in-depth, practical training sessions that normally come with career support such as portfolio reviews, mentorship, and job placement assistance.

  • Springboard: UI/UX boot camp with a job guarantee.
  • Prices: $6,900-$8,500
  • CareerFoundry: UI Design Program (mentorship included).
  • Price: $6,555 (could differ based on the payment plans you choose).
  • Designlab: UI/UX bootcamp with mentoring.
  • Cost: $6,749
  • Pricing: $4,000 – $9,000 (One-time payments or monthly subscriptions)

The books

Books on best practices for user interface (UI) design analytical thoughts into practice.

  • One instance is ‘Don’t Make Me Think’ by Steve Krug and ‘The Design of Everyday Things’ by Don Norman.
  • An example cost would be $15-50 per book.
  • A small collection may cost $50 – $150

Costs Summary

  • Free: using YouTube videos, blogs, and no-cost coursework hence henceforth costing nothing.
  • Cheap: online portals such as Udemy or Coursera charge around $10 up to about $100 depending on each course.
  • Moderate: subscription-based platforms (cost: $20–$100 per month).
  • Expensive: boot camps that are less than or equal to four thousand dollars up to fifteen thousand dollars (4000-15000).

Frequently Ask Questions

What amount of time is used to learn UI design?

This depends on the daily practiced time you dedicate to learning and previous experience; hence for starters, it may take 2–4 months to understand the simple things if they give it their all every week but become skilled and create a good portfolio within 6–12 months especially when doing real projects and having continuous practice


Is coding a must for someone who wants to become a UI designer?

Not actually, coding is not a requirement for UI designers but it can be beneficial. For instance, knowledge of HTML, CSS, and Javascript languages will make communication better with developers as well as help you grasp some of the technical problems laid down in your designs. Nevertheless, most of the professional users interface designers do not touch on coding


How about essential tools that I need for UI design?

Some of the most famous tools used in earlier user interface designing are:
Figma: A website-based tool for the creation and prototype development of UI that is also beginner-friendly and used widely in this industry.
Sketch: A desktop application running under macOS committed to UI design and is renowned for its clear interface and integration into other systems related to design.
Adobe XD: Initiative created one of the leading graphics editing programs often as a good companion with other Adobe products.

Video Shooting Camera 4k

Video Shooting Camera 4k, digitalanivipracticeb

A camera that shoots video in 4K captures video in a resolution four times higher than that of full HD (1080p). This resolution provides greater clarity and more detail while allowing for greater flexibility during post-production processes including cropping and scaling without losing quality.

The following are some features of 4K cameras meant for shooting videos:

  • High Resolution (3840 x 2160 pixels): Guarantees exceptional sharpness and clarity.
  • Color Accuracy and Depth: Most 4K cameras offer support for 10-bit color depth thus providing richer colors and a better dynamic range.
  • Frame Rates: 24fps, 30fps, or 60fps, frequently found on the device, give it freedom on motion capture.
  • Professional Features include focus peaking, zebra patterns, and log profiles meant for color grading.
  • Interchangeable Lenses: Many top-level 4K cameras have interchangeable lenses making them versatile in different settings.
  • Some popular 4K video shooting devices Include the Sony A7S III, Canon EOS R5, Panasonic Lumix GH5, etc. In addition to Blackmagic Pocket Cinema Camera 4K
Camera for recording video in 4k price in India

The cost of 4K video shooting cameras in India varies depending on the brand, features, and type of camera (DSLR, mirrorless, camcorder, or action camera). Here are some popular 4K cameras with their approximate prices in India:

  • Sony A7S III (Mirrorless)
    Price: ₹3,00,000 – ₹3,50,000
    Description: A high-performance full-frame mirrorless camera that is ideal for low-light video recording and supports 4K recording at 120fps.
  • Canon EOS R5 (Mirrorless)
    Price: ₹3,40,000 – ₹3,60,000
    Description: A full-frame mirrorless option that allows shooting 8K RAW videos as well as recording them at 4K speeds of up to 120fps, making it perfect for professionals.
  • Panasonic Lumix GH5 (Mirrorless)
    Price: ₹1,25,000 – ₹1,50,000
    Description: A popular choice among videographers offering 4K video recording at 60fps and having built-in image stabilization.
  • Blackmagic Pocket Cinema Camera 4K
    Price: ₹1,00,000 – ₹1,20,000
    Description: This camera is known for making movies; it supports 4K DCI recording along with ProRes and RAW capabilities.
  • GoPro Hero 11 Black (Action Camera)
    Price: ₹50,000 – ₹60,000
    Description: The GoPro Hero 11 is compact and rugged which shoots 4K at 60fps hence a great camera for vlogging and action shots.
  • Fujifilm X-T4 (Mirrorless)
    Price: ₹1,50,000 – ₹1,75,000
    Description: Designed for videographers this X-T4 is the first true mirrorless Hybrid camera capable of 4K DCI recording speed of 60 fps with good color rendition and image stabilization.
  • Sony Alpha ZV-E10 (Vlogging Camera)
    Price: ₹65,000 – ₹75,000
    Description: A vlogging camera that has 4K video and superior autofocus capabilities

Prices may vary depending on discounts, availability, and sellers. Therefore it’s wise to check web stores such as Amazon India or Flipkart or visit local camera stores for the latest offers.

Comparison of 4K 30fps and 4K 60fps

Choosing between 4K 30fps or 4K 60fps depends on what you are shooting and what you want. Here is a summary to help:

4K 30fps (Frames Per Second)
  • When you are shooting a movie or a television show, 30fps looks smoother: It is often used in movies and other cinematic productions as it has a slower frame rate but still looks natural. It reproduces the traditional film style of 24 frames per second (fps) and thus gives the projection a “cinematic” feel.
  • Lower file size: Fewer frames captured per second at 30fps, which means less storage space compared to that of 60fps videos.
  • Easier to work with hardware: For example, laptop computers are usually under resources for editing and rendering 4K 30fps videos.
  • Best for Slower-Based Content: Works best for content that does not have much motion like interviews, vlogs, landscape films, etc.
4K 60 fps (Frames per Second)
  • Smooth motion, perfect for action: 60fps is ideal for fast-moving scenes such as sports, action films, and games. It accommodates more frames per second hence these movements appear more fluent and clear than at lower frame rates.
  • Best suited for Slow motion: If you want to slow down your clips during editing 60fps gives you more options. Without compromising too much on the fluidity, you can slow it down to 30 fps or even less.
  • Sharper movement, higher realism: 60 fps is often preferred for content that requires sharpness and realism such as product demos, nature documentaries, and video games. It is also good for capturing fast-moving objects more clearly.
  • More demanding on storage and editing: compared to 30 fps, 60 fps files are larger thus demanding more storage space as well as processing power for editing and rendering videos.
Which One to Choose?
  • Use 30 fps especially on narrative-driven content, interviews, or slower scenes for a more cinematic, natural feel.
  • If you want clarity of motion i.e., filming fast action, sports, or any other scenario where clarity of motion is paramount – then use 60 fps. Or if you want your editing to slow down during the scene.

Ultimately, 4K 60fps provides smoother and more flexible footage while 4K 30fps has a traditional cinematic experience but less hardware demand.

Frequently Ask Questions
What does it mean for a video camera to be 4K?

A 4K video camera captures footage at resolutions of 3840 by 2160 pixels, which is four times more detailed than the full HD (1080p) resolution. This results in sharper, clearer, and highly detailed videos making them perfect for video production of professional quality.

4K shooting advantages

The major benefits of shooting using 4K are better quality images, improved color accuracy, and flexibility in post-production (such as zoom or cropping without losing resolution), among others. It is also future-proof since many devices and platforms are already set to support 4K displays.

 Storage needs for 4K video recording

4k video files are much bigger than 1080p videos; hence you will need high-capacity storage including fast SD cards like UHS-II or V90 along with enough space on the computer to effectively handle these large files when editing them.

Is it mandatory to use a 4K camera on every project?

No; not all projects require a 4K camera. If your videos are mostly meant for social media, online streaming, or viewing on mobile devices then Full HD (1080p) would be enough. But in terms of professional filmmaking, documentaries, or commercial projects, nothing is better than 4K quality.

Is it possible to record a 4K video without breaking the bank?

Absolutely! Several low-cost cameras allow for shooting in ultra-high definition, among them are beginner-friendly mirrorless devices and certain smartphones. Examples of inexpensive 4K camcorders are from well-known producers like Sony, Panasonic, and Canon

UI Fonts

UI Fonts, digitalanivipracticeb. digitalanivipractice

Fonts created specifically for user interfaces including websites, mobile applications, and software programs among other digital platforms are known as UIs (User Interfaces). In small sizes and across various screen resolutions, they care about legibility, readability, and clarity. Users can easily interact with digital products by reading texts like instructions, menus, or buttons without getting tired thanks to the good work done by UI fonts.

The following are some of the major characteristics that make up UI fonts:

  • Legibility: Fonts that are easy to read irrespective of size. Most have very clear letterforms that increase their recognizability.
  • Simplicity: Most of them tend to have simple clean letterforms so as not to distract. With different screens and resolutions, these UI fonts must maintain their clarity and appearance.
  • Consistency: Their appearance on multiple devices and different screen resolutions is appealing. They help maintain visual consistency across different parts of an interface, creating a cohesive look and feel.
  • Spacing: To improve reading they mostly possess even tracking within texts.
  • Scalability: At any point during their growth they will never lose quality or transparency.
  • Web-safe: Many UI fonts are optimized for digital environments and often regarded as being web-safe which means they work perfectly well in different browsers or devices.
  • Versatility: They can also work well in different types of content, ranging from headings to buttons, body text, and labels.
Some Common UI Font Types Are
  • Helvetica Neue – This is known for its modern and clean look.
  • Roboto – Google designed this to ensure good readability on screen.
  • Open Sans – it’s a humanist sans-serif font that is legible when it’s small
  • Segeo UI – Used in Microsoft applications where one needs a neat and professional appearance.
  • Montserrat – This is an innovative geometric sans-serif that gives a classy feel.
  • Poppins – Since it possess geometric forms with a neat look, it can suit headings and body texts appropriately.
  • Source Sans Pro – the open-source sans-serif created by Adobe, especially for user interfaces.
  • Nunito – A rounded sans serif that has friendliness as well as readability.
  • Work Sans – A sans-serif font optimized for reading on screens.
  • Proxima Nova – this one is favored for being neat and modern, intertwining geometric with humanist styles.
  • Fira Sans – it functions well in different UI environments because its legibility was its primary aim.
  • PT Sans – offers a direct and impartial line of appearance fit for various uses.
  • Glock – A flexible serif typeface that can bring refinement to UI parts

It is very important to choose the appropriate UI Font as this makes an interface easy to use and attractive.

How can I download fonts for UI design?

To make a long story short, here is a simplified procedure for downloading fonts:

Identify the Font Decide on the font you would want to use. Several repositories such as Google Fonts, Adobe Fonts, or other types of foundries provide this service.

Download From Repositories:
  • Google Fonts- Go to Google Fonts then search for your desired font and click on the “Download family” button to obtain a ZIP file that contains font files.
  • Adobe Fonts- In case you possess Adobe Creative Cloud membership, you have a chance to synchronize your fonts directly into your system through the Adobe Fonts website.
Download From Foundries:
  • Inquire at their website (for example: Font Squirrel, MyFonts), identify a specific font you like, and follow instructions towards downloading which may include either purchase or free version download.

Install The Font:

  • Windows Users: Double-click on the downloaded ZIP file, choose .ttf or .otf files, then right-click on the font file and select the “Install” option.
  • Mac Users: Similarly open the downloaded ZIP file extract font files and double-click on a specific type in those files viewed by a preview window that follows installing other applications among other steps.
Utilization in Design Programs:
  • After installation, the typeface will be accessible in your graphic design tools such as Adobe XD, Figma, Sketch, and more. In your app, just select the font from the list of available fonts.
Verify License:
  • Make sure that you possess an appropriate license for the typeface, especially if it’s going to be utilized for business ventures.

That’s all! You can now include the new font in your UI design initiatives.

Frequently Ask Questions
What features should a good UI font have?

An ideal font for UI purposes should be readable, understandable, and adaptable. It must have good scaling qualities throughout diverse screen sizes or devices, remain legible despite weight differences (in terms of thickness such as bold or light), and if required support various languages. Generally, sans-serif typefaces are preferred due to their simplicity and clarity

How do display fonts differ from UI ones?

Display fonts have been specially made to meet the needs of big-sized letters, often found in headings or titles where they are mainly done for style and impact. UI fonts are tailored for better readability when they are small-sized and for body text, buttons, menus, and other interactive components. In general, art cannot be prioritized over usability in UI fonts

Choose the Right Font Size UI Design?

The font size must be large enough so that it can be readable on every screen while not extensive enough to waste various spaces. A body text size of 14 – 16 px is a regular base for web interfaces; 16 – 18 px is highly recommended for mobile apps to agree with the readability while zooming

Are free fonts reliable for UI design?

However, some free fonts are very reliable and are often used by professionals in making UI designs such as those from Google Fonts or Font Squirrel. But it’s important to check if they optimize well on different screen sizes and resolutions, besides checking whether there’s a commercial usage license available

What’s the difference between TTF and . OTF font formats?

File Formats True Type Font (.TTF): They are older and more compatible with various operating systems and gadgets. Their glyph shape is simpler than Open Type Fonts (.OTF). Open Type Fonts (.OTF): These are TTF extensions with additional features such as improved support for special characters, ligatures, typographical controls, etc. Therefore, the OTF format remains the preferable choice for high-quality UI designs because of its flexibility

LED Light for Video Shooting

LED Light for Video Shooting, digitalanivipracticeb

What is LED light for video shooting?

Video shoots often utilize LED lights due to their adaptability, energy-saving capacity, and capability to generate consistent high-quality illumination. During filming, these lights will illuminate the subjects or scenes in front of them while adjusting brightness and color temperatures based on different shooting scenarios.

There are several reasons as to why LED lights are recommended for shooting video:
  • Easy to transport: During on-location shoots, these LED lights are very useful since they are light in weight.
  • FF or CC: Fine-tuning of color temperatures is a common practice with many LED lights. Cool color ranges (say from daylight) to warm ones (like tungsten) help in matching ambient light or creating desired hues.
  • Low heat emission: This means that other than traditional lighting which releases too much heat. With LED bulbs you can enjoy comfortable sessions even if they last long.
  • Dimmer or not: Most of the systems have dimming options. Thus enabling cinematographers/the photographer to adjust brightness levels without changing hues as well
  • Battery-operated: To make it easier for someone shooting in places where there’s no power source or wall socket many have battery-operated options.

These lights found themselves being used in a variety of areas including interviewing people/ vlogging/filmmaking.

LED lights are commonly used in video shooting to provide the necessary level of illumination and creative effects. Here are the main types:

LED Panel Lights
  • Description: Flat and rectangular or square-shaped with several small light sources placed very close together to create one large source of light that is soft enough for large areas or subjects.
  • Use Ideal for interviews, studio setups, and vlogging.
  • Features: The brightness and the color temperature can be changed, they are lightweight as well as portable.
Ring Lights
  • Description: Circular LED lights that produce low-shadowed, even light which leads to a unique catch-light formation on the audience’s eyes model.
  • Use: Best suited for beauty vlogging, portrait videos, and close-up shots.
  • Features: Mounted around camera lenses or right in front of subjects.
On-Camera LED Lights
  • Description: Tiny light stickers made of light-emitting diodes affixed above the camera’s body through a hot shoe mount. They are incredibly lightweight and supply immediate illumination for nearby objects.
  • Uses: Handy in filming videos with a phone, capturing happenings in events, and also quick shots.
  • Features: Battery-operated and very handy.
Bi-Color LED Lights
  • Description: These kinds of LED lights let you switch from cold daylight to warm tungsten which enables the user to have more control over the lighting ambiance.
  • Uses: Applicable in situations where temperature altering is necessary like indoor as well as outdoor shooting.
  • Features: The possibility of regulating various temperatures for enhancing flexibility when it comes to illumination.
LED Tube Lights
  • Description: Long and cylindrical lights that resemble fluorescent tubes. They are known for their soft lighting and thus preferred for creating stylish lighting set-ups or serving as props in pictures.
  • Uses: Music videos, product videography, etc.
  • Flexibility in placing them anywhere and most often have RGB ability for the amazing color effects
RGB LED Lights
  • Description: These lights provide a wide range of colors through different combinations using red, green, and blue LEDs. They are ideal for creating dynamic colorful lighting effects for video projects.
  • Uses: Great illumination during music videos or any other artistic video production among others where mood lighting could be extremely crucial
  • Features: Total spectrum control of colors with intensity adjustment feature in place
LED Fresnel Lights
  • Description: Light directing using a fresnel lens with LED sources hence giving the cinematographer beam direction control and intensity under his/her fingertips; this allows him/her to produce soft or hard light depending on requirement.
  • Uses: It is perfect for professionals in film studios, interviews, and any other lighting arrangement involving more control over illumination.
  • Features: It is what we can say about it as regards its features.
Spot Lights
  • Description: Small white LED lights that can be made brighter by adjusting the intensity. Monitors and television screens use ambient lighting for aesthetic purposes.
  • Use: Ideal for key lighting in professional film sets, interviews, and other controlled lighting setups.
  • Features: Focusable beam, adjustable brightness, and color temperature
Softbox LED Lights
  • Description: LED lights placed inside a softbox diffuser produce very soft, even lighting that is perfect for minimizing harsh shadows.
  • Use: This type of lighting is widely used in interviews, product videos, as well as portrait photography.
  • Features: Excellent for soft lighting and removing harsh shadows.
Portable LED Light Sticks
  • Description: Handy little stick-like LED lights that are easy to hold or mount. They’re versatile and usually available with several different color settings.
  • “Use”: Handy when shooting with mobile devices or adding creative light effects where you want them on set.”
  • Features”: Lightweight, rechargeable, often RGB capable.
Sound on board” LED lights
  • Description: Extremely powerful effective lamps emit bright concentrated beams of light via a cluster of soldered-together halogen bulbs.
  • Such are usually employed for key lighting main illuminating devices used by professional studios who do it all” or cinematic shots etc.
  • High brightness focusable beam often comes with modifiers like a softbox or grid, etc.
  • The Zylight Go-Panel Bi-Color LED Light: For instance, is a versatile panel designed with electronically adjustable diffusion and a very broad color temperature ranging from 3100K to 6200K suitable for lighting fine-tuning arrangements (Videomaker).
  • Litepanels Gemini 1×1 RGBWW LED Panel It is known for having multiple lighting modes such as CCT, Hue, Saturation, and Gel presets ideal for professionals and content creators looking to have precise control over colors and brightness (Videomaker).
  • Nanlite PavoTube II 30XR is another tube light: It features advanced features such as pixel-based effects, and DMX compatibility as well as a wide range of colors from 2700K to 12000K which are perfect for creative lighting (Videomaker).
  • On the other hand, Lume Cube RGB Panel Pro 2.0: Is one option that caters to people who want budget-friendly items when making their visual inputs because it has several effects at less than a $100 price tag, comes with Bluetooth control and a high color accuracy rated at 96 CRI or above (Shotkit).
The advantage of each type of LED lighting is determined by the purpose of photography, its light requirements, and the mood that you want to depict. LED Light for Video Shooting

Frequently Ask Questions

What is the purpose of using LED lights in video shooting?

They are used because of their efficiency, low heat output, and durability as well as providing consistent and adjustable lighting which makes them perfect for both indoor and outdoor shoots under various lighting conditions.

Can you use LEDs outdoors for video shooting?

Yes, you can use LEDs outdoors. Most of them are portable and battery-operated making them ideal candidates for on-location shoots while some come with weatherproof features so that they can be used outdoors

What is the benefit of bi-color LEDs?

The bi-color feature allows you to alter the color temperature between either cool (daylight) or warm (tungsten), thus enhancing your control over scene illumination and helping it blend with the available natural light

How do RGB LED lights improve videography?

This kind of lighting makes it possible for filmmakers to develop dynamic colorful lighting effects since it gives a wide range of color control across spectra, therefore suitable music videos, imaginative storytelling, or mood-setting lighting

Can LED lights be dimmed during video shooting?

Most LED lights for video shooting come with adjustable brightness controls that help the user to darken or lighten the light to achieve the required effect on their scene.

Optimized with PageSpeed Ninja