Here is a simple step-by-step guide on how to hide or reveal some parts of the clips in your footage using Adobe Premiere Pro
1. Import and Select your Clip
Import your Footage: Drop your video clip into Premiere Pro and drag it onto the timeline.
Select the Clip: On the timeline, click the clip.
2. Access the Effects Controls Panel
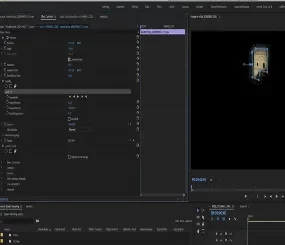
Open Effects Controls: When you select your clip, navigate to the Effect Controls tab. If you can’t see it, press Shift + 5 to do so.”
3. Create a Mask that Supports Masking
Choose an Effect: Apply a masking-compatible effect. For masking, the most common effects used are Opacity, Lumetri Color, and some of the Blur & Sharpen effects such as Gaussian Blur.
4. Generate a Mask Creating a Mask:
- Below your chosen effect from the Effects Control Panel, options for making different kinds of masks like – Ellipse Mask: press the Ellipse Mask Button to make the circular or oval-like mask.
- Rectangle Mask: To create a rectangular or square-shaped mask, tap on the “Rectangle Mask” button.
- Free Draw Bezier: For a customizable mask, click the “Free Draw Bezier” button.
5. Fit Mask
- To change the shape, size, and position of the mask, click on it in the Program Monitor. As required, drag its corners or edges to adjust its position/size ratio.
- Thicken the Mask Border: The Effect Controls Panel allows you to soften the mask’s edges by feathering it.
- Increase Opacity and Spread: The mask can be finely adjusted by fine-tuning the Mask Opacity and Expansion.
6. Add animation to the mask when needed
- Adding keyframes: You can animate a mask if you need it to change over time. To add keyframes at various points along the timeline, click the stopwatch icon beside Mask Path.
- Alter the position and shape of the mask at each keyframe so that it moves across the screen.
7. Put on a mask Final Touches
- Make any other adjustments necessary on both mask and effect parameters for you to achieve your desired appearance.
Example: How to Blur an Image
1. To apply the Gaussian Blur effect on your clip, just drag and drop Gaussian Blur onto it.
2. On the Effect Controls panel, somewhere below Gaussian Blur is the Free Draw Bezier button; click it to create a mask.
3. Draw a mask around the area you want to blur
4. Alter the Blurriness values to increase the amount of blur within the selected region
5. For softer edges use Mask Feather settings
Follow this list of steps and effectively use masking in Adobe Premiere Pro to enhance your video editing projects with a good amount of control over your footage that is precise and creative as well.
Advanced Masking Techniques in Premiere Pro
Incorporating Many Masks
- Usage of Many Masks: A single clip or effect can have more than one mask. To incorporate another mask, select the effect you are interested in from the Effect Controls tab, and then click the type of mask you wish to add (Ellipse, Rectangle, or Free Draw Bezier). Consequently, every mask will be listed independently of any other under the same effect.
- Here is a human language version of the text: “You can adjust each mask independently. Each mask has specific features that are used to control it. You can change the opacity of the mask, adjust its feathering, or even its expansion”.
Mask Tracking
- Mask Tracking of Moving Objects: In Premiere Pro there are such tracking tools as to track moving objects and adjust automatically the mask’s position, size, and rotation. Once the mask is created, click on Play in Mask Path to start tracking – in this case, Premiere Pro will analyze frames and move the mask depending on them.”
- The mask’s track can also be adjusted manually in the Effect Controls panel by moving Mask Path keyframes if automatic tracking is not ideal.
Combining Masks with Effects
- Merging Masks with Effects Merged with Color Grading: Make use of masks to single out sections for color grading. As an illustration, you can give a person’s face a Lumetri Color effect, lighten up, and put a mask around the face. In that way, the rest of the scene will remain undisturbed as such an action isolates the effect under consideration.
- To blur or sharpen particular areas of your video by combining some masks with Gaussian Blur or Sharpen effects. Deciding to use this means you can blur sensitive data during video editing or emphasize some specific region.
Nesting Sequences:
- Occasionally, it’s useful to embody one sequence of clips into another, and then use masks on the nested sequence. Highlight clips in your timeline, click on the right button and select Nest. This serves to simplify things in your tough projects as well as making them easy to edit mask-wise.”
- Before crafting animations in After Effects, think about applying this application for masking purposes. By connecting your work in Premiere Pro with After Effects, you can create complicated masks and effects in Premiere Pro that will automatically get updated.
Example Practical: Wearing a Mask to Replace a Face Importing
- Footage: Import your original clip and the clip with the face you want to replace.
- Align footage: Place the face replacement clip above the original clip in the timeline.
- Make a mask: Apply the Opacity effect on the replacement face clip. Use the Free Draw Bezier tool to make a mask around the face.
- Feather: Adjust Mask feathering so that it can blend the edges of the face with the original clip.
Effective Masking Pointers
- High-Resolution Footage: Mask better by choosing higher-resolution footage.
- Zoom In: Refine the edges of a mask by zooming into the Program Monitor.
- Use Contrast: Detect better edges with masks around areas with high contrast.
- Feathering: Don’t create harsh edges; always feather your masks slightly. Refine Keyframes: Always review and refine keyframes accordingly when animating masks.
Chroma Key in Adobe Premiere Pro - Digital AniViPractice
[…] will be discussing how to use the chroma key in Adobe Premiere Pro. Specifically, we will look at how color hues can be utilized in compositing digital images and […]