Before knowing how to Change the Aspect Ratio In Premiere Pro. 1st we will first understand
What is the Aspect Ratio In Premiere Pro?
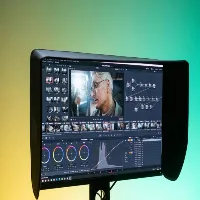
In Adobe Premiere Pro, the aspect ratio of a video frame refers to how wide it is compared to its height. It is important for editing because it decides how the video looks on various screens and platforms. It is important to know how to handle aspect ratios when using Premiere Pro to have your content appear as it should without any distortions or black borders.
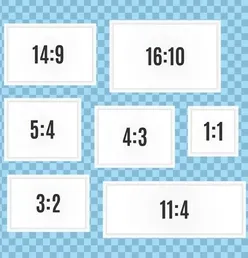
Common Aspect Ratios:
- 16:9 (Widescreen): It is used for the majority of contemporary videos such as YouTube, television broadcasts, and several online streaming services. The ratio that is most often featured in modern videos fits into the majority of online platforms, HDTVs as well as smartphones
- 4:3 (Standard): Present on ancient television sets and video cameras.
- 1:1 (Square): Mostly social media platforms such as Instagram.
- 9:16 (Vertical): Mainly as mobile content like Instagram Stories and TikTok.
- 21:9 (Cinematic): Appropriate for giving a cinematic look and provides wider field of view
Importance:
- Visual Composition: Your video must use the right aspect ratio. So that it is framed properly and has an effective overall composition.
- Platform Compatibility: each platform has its own preferred or required aspect ratio so the correct aspect ratio setting will guarantee the best appearance of your video on all these platforms.
- Professional Standards: One is required to ensure the right aspect ratio as far as Professional Standards are concerned to obey Industry thresholds, essentially for broadcast and professional media.
Working with Aspect Ratios in Adobe Premiere Pro.
- Always have the same aspect ratio when working on a project to avoid problems with black bars or cropping.
- Know your audience and decide what aspect ratio is best for them.
- Framing: When you change your framing and arrangement, use the ratio you have selected best.
- Custom Export Settings: Make sure that when exporting videos, the with which it is exported corresponds to that of the sequence avoiding any involuntary scaling or letterboxes.
Fully grasping the importance of maintaining the aspect ratio while working in Adobe Premiere. Ensures that the displayed content appears just as it was intended on a variety of devices and platforms thus improving the audience’s viewing experience.
Now, How To Change Aspect Ratio In Premiere Pro
The aspect ratio of your video project can be adjusted easily in Adobe Premiere Pro. To change it follow these steps:
Open your Project
- Open Adobe Premiere Pro and load the project for which you need to change the aspect ratio.
Adjust sequence settings
- Go to the top menu and select Sequence> Sequence Settings. A Sequence Settings dialogue box will appear.
Frame size
- It can be altered Frame Size fields under Video can be located in the Sequence Settings window.
- Ensure Horizontal and Vertical values are correct as per your video aspect ratio.
- For example: If the ratio is 16:9 you should enter 1920×1080.
- If the ratio is 1:1 you should enter 1080×1080.
Confirm and Employ
- Once you have made changes in the size of the frame, press the Okay button for the new settings to take effect.
- If the sequence was already created. You may receive a warning that it will be affected by these changes. Click on Okay to continue.
Modify Footage
- You may have to modify your footage for it to match up with the different aspect ratios.
- On your timeline select all video clips after which you will adjust their scale and position under the effect controls panel so that they can fit adequately within this fresh frame size.
Export Settings
Before exporting your content please ensure that export settings correspond to the new aspect ratio.
- Go to File & Move to Export & Media.
- In the Export Settings dialog presented, verify Video tab settings s/t that the width and height numbers tally with your particular aspect ratio change.
- Make your choice concerning format and customizations then opt for Export.
In Adobe Premiere Pro, you can change the aspect ratio of your project effectively by following these steps.
Why change the aspect ratio in Premiere Pro
There are several reasons why you might need to change the aspect ratio in Adobe Premiere Pro depending on your project’s needs and where it will be viewed. Let us look at such instances.
Different platforms and social media sites demand unique aspect ratio specifications for optimum viewing. For instance,
- YouTube: Typically uses 16:9.
- Instagram Stories/Reels: Uses 9:16.
- Instagram Feed Videos: Uses 1:1.
- Facebook: Various aspect ratios depending on the type of post (16:9, 4:5, 1:1).
Creative Vision
- Changing the aspect ratio makes it possible to make a specific design or look. For example, if you use an aspect ratio that is wider like 21:9, it can make your video feel as if it is like one in a movie theater.
Consistency across media
- For example, when incorporating videos into slide shows or online projects with given aspect ratios.
Compatibility with the Screen.
- Indeed refers to a situation whereby we have different images (on a TV, a smartphone, a tablet, or the cinema) and each one of them has its aspect ratio which is adapted in such a way to provide maximal convenience during the viewing process.
Repurposing Content
- When you repurpose existing materials for other mediums, adjusting the aspect ratio makes sure that your video will be suitable and correspond to the design on these platforms”.
Removing Unwanted Elements
- Changing the aspect ratio can help crop out unwanted elements from the video that include distracting backgrounds or irrelevant details.
Focus on Subject
- Adjusting the aspect ratio can help draw viewers’ eyes to the main subject of the video by shifting its framing.
Meeting Customer Requirements
- For instance, a client may have some guidelines that they follow in coming up with the aspect ratio that fits their brand or the platform where they would like to upload a video.
Technical Standards
Technical Norms Other than making films for broadcasting, certain fixed aspect ratios must be adhered to when producing professional films.
When you understand and implement it properly, an appropriate aspect ratio in Premiere Pro is a method for ensuring that what you deliver is in line with set requirements hence leaving an intended effect in the end consumer.
Shortcut To Changing aspect ratio in Premiere Pro
While using a shortcut If you happen to wonder if a keyboard shortcut can change the aspect ratio in Premiere Pro quickly, then rest assured; with these steps, within no time at all:
Click on the sequence in the timeline you want to change.
Select Sequence: Open Sequence Settings Press Shift + 5 to open the Effect Controls panel, then click on the timeline to make sure the sequence is selected.
Access Sequence Settings: Press Alt + S (Windows) or Option + S (Mac) to open the Sequence Settings dialog box directly.
Change Aspect Ratio
Resize Frame: Within the Sequence Settings dialog adjust the Frame Size (width and height) till you achieve the required aspect ratio that pleases you.
- E.g. For 16:9 aspect ratio set it to 1920×1080.
“Make Changes: Select OK to keep the changes you make.”
“Fit Clips to the New Aspect Ratio.
To select the clip: On the timeline needing adjustment, click on it.
Shortcut to Effect Controls: Press Shift+5 and the Effect Controls Panel will open up.
Adjust Scale and Position: Move the Position and Scale sliders of the motion so that the video fits into the New aspect ratio.”
Tips
Aspect Ratio: Check your sequence settings earlier to avoid getting images that are either cropped or letterboxed.
Preset Creation: To quicken your work later, think about making a sequence preset containing aspect ratios that one uses most frequently.
These steps and shortcuts make it possible for you to change the aspect ratio using Adobe Premiere Pro in a faster way hence meeting your targeted video specifications.